

How to record a Google Meet on any laptop and phone ?
Ok, let’s go straight to the point. This is a guide on how to record a Google Meet with ease and without breaking the bank. Whether you're a Mac enthusiast, a Windows lover, or someone who's always on the move and wondering how to record Google Meet on phone, we've got you covered.
Dive in to discover the secrets to record Google Meet free on various platforms, ensuring you never miss a moment again.
Can you record a Google Meet ?
Not every participant in a meeting has the liberty to record. Let's break down the prerequisites:
1) Accessing the Record Option: First and foremost, when in a Google Meet, click on the "More Options" icon (usually represented by three vertical dots). If you see a 'Record' option, it indicates you have the permission to start recording.
2) Permissions and Prerequisites: Does Google Meet allow recording for everyone? No. You need to have been granted recording access by the Google Workspace administrator. Also, to record a meeting, you either need to be the meeting host, a co-host, or belong to the same organization as the host.
3) Google Workspace Editions: Your team must be registered to one of the following Google Workspace editions:
- Essentials
- Enterprise Starter, Essentials, Standard, or Plus
- Business Standard or Plus
- Workspace Individual Subscriber
- Education Plus
- Teaching and Learning Upgrade
How to Record on Google Meet Natively
Ways to Record
1) Directly from More Options: As discussed in the previous section, one of the most straightforward methods is to:
- Click on the 'More options' icon (typically represented by three vertical dots).
- From the dropdown, select 'Record Meeting'.

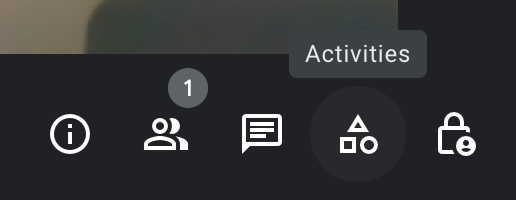
2) Through the Activities Icon: Another easy method involves:
- Clicking on the 'Activities' icon, which is symbolized by a triangle, square, and circle.
- Navigate to the bottom of the panel, and you should see an option to 'Record'.
Google Meet Recording Not in Drive
If you're wondering where do Google Meet recordings go and you're unable to find your recorded session, it might be due to a few reasons:
1) Processing Time: Sometimes, Google is still processing the video. It might take a bit of time before the recording becomes visible in your Google Drive. (maximum 24 hours in general)
2) Change in Organizer or Timing: If the meeting took place outside the scheduled time or if there was a change in the organizer, the recording is sent only to the creator of the event. More details can be found here.
Auto Record Google Meet
Unfortunately, Google Meet does not have a native function to auto-record meetings. As of now, you'll need to initiate the recording manually each time.
How to record a google meet without permission for free?
Ok, now what if you don't have the permission to record directly within Google Meet? We’ll talk briefly about different options and dive deeper in later sections
1) When you’re on a Mac or PC: Both macOS and Windows come with built-in screen recording capabilities. These can be leveraged to capture not just Google Meet, but any activity happening on your screen.
2) Recording on Mobile (iOS or Android): Just as with laptops and desktops, mobile devices also provide ways to record screens.
3) Extensions: One of the most efficient ways is using browser extensions. A popular choice is tl;dv (tldv.io), which not only allows recording but also provides summarized video content, making it easier to review lengthy meetings.
Having presented these options briefly, let's dive deeper into the specifics of each method in the following sections. Whether you're on a laptop, phone, we've got you covered.
How to record a google meet on Windows?
Step 1. Open Game Bar: Before you proceed, ensure you have the screen and audio recorder installed on your Windows 10 PC. This tool is known as the Game Bar. If you don’t have it yet, you can download Game Bar from the Microsoft Store. Simply follow the on-screen instructions to complete the installation.
Step 2. Activate Game Bar: It’s essential that the Game Bar is activated on your PC for the recording process to work. To do this:
- Press the
Windows + Ikeys simultaneously to access the Settings menu. - From here, select Gaming.
- Next, click on Xbox Game Bar.
- Finally, toggle the switch to On. This step ensures the Game Bar is activated on your computer.
Step 3. Select the Recording Settings: Configuring your recording settings ensures the best quality for your Google Meet recording. To do this:
- Navigate to the Captures tab within the Game Bar settings.
- Here, you can adjust various settings such as the video frame rate and quality.
- You can also modify the maximum recording length and select a specific output folder for your recordings.
Step 4. Record Your Screen and Audio on Windows 10: You're now all set to record your Google Meet session. When you're ready:
- Press
Windows + Gto display the recording panel. - Alternatively, pressing
Windows + Alt + Rwill begin the recording immediately.
Remember to ensure your Google Meet window is open and active during the recording. Once you're done, access the output folder you previously selected to find and view your recorded meeting.
How to record Google Meet on Mac with video and audio for free ?
There's no direct native option to record video and audio of Mac directly during a Google Meet session but we've found an effective workaround to get the job done. Just follow these steps
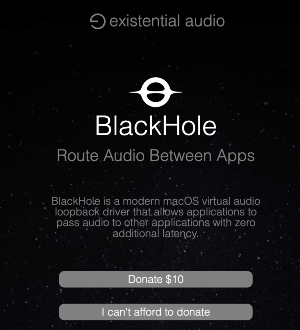
1) The Workaround: BlackHole:
- To get started, you'll need to install a software called BlackHole. This acts as a bridge to route your system's audio, ensuring that both the video and audio of your Google Meet sessions are captured.
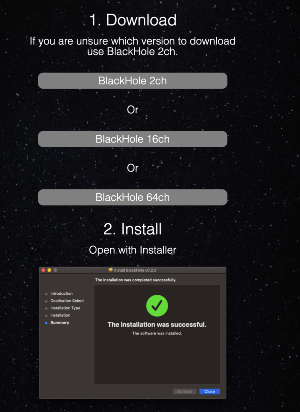
- To download BlackHole, visit https://existential.audio/blackhole/. While it offers an option to donate, it's not mandatory. Whether you choose to donate or not, you'll receive a link by email.
- Once you have the link, follow the step-by-step instructions provided by BlackHole to install the software on your Mac. (We recommend the 16ch installation)
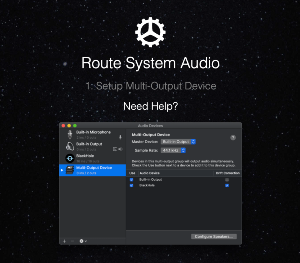
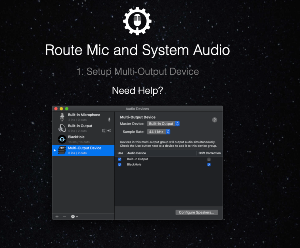
2) Audio Routing:
- With BlackHole installed, it's crucial to route your audio correctly. This ensures that you capture both the system audio and your microphone input.
- For a quick tutorial on this, visit https://existential.audio/blackhole/support/#system and follow the guidance to set up either the aggregate device or multi-output device, as per your requirements.
3) Recording Your Google Meet Session:
- Now, with everything set up, it's time to record your Google Meet on Mac.
- Launch the screen recorder on your Mac by pressing
Cmd + Shift + 5. - Before hitting the record button, go to settings and select the appropriate device (either Aggregate device or multi-output device).
- With everything in place, open your Google Meet session and click on 'Record'.
And that's it! With these simple steps, you now know how to record Google Meet on Mac with both video and audio seamlessly. So the next time you have an essential meeting or presentation, you won't miss a thing!
How to record Google Meet on a phone ?
How to record Google Meet on Android ?
1) Navigate to the Quick Settings Panel: On most Android devices, you can do this by swiping down from the top of your screen.
2) Look for the Screen Recorder Icon: Depending on your phone brand and software version, the icon might differ. It's usually represented by a video camera or circle icon.
3) Tap on the Screen Recorder: Before it starts recording, you'll be prompted with some settings options such as recording sound (from the mic, device, or both) and video resolution. Adjust these according to your preferences.
4) Join or Start your Google Meet Session: Once inside the meeting, go back to the Quick Settings Panel and tap the screen recorder icon to start recording.
5) End the Recording: Simply pull down the Quick Settings Panel again and tap on the screen recording notification to stop it. Your recording will be saved in your device’s gallery or a designated folder.
This method allows you to know how to record Google Meet on phone as a participant or as a host using the built-in Android screen recording feature.
How to record Google Meet on iPhone or iPad ?
1) Setting up Screen Recording: First, enable the screen recording feature by going to Settings > Control Centre. Then, Scroll down to find 'More Controls' and then tap the Add button (which looks like a '+' sign) next to Screen Recording.
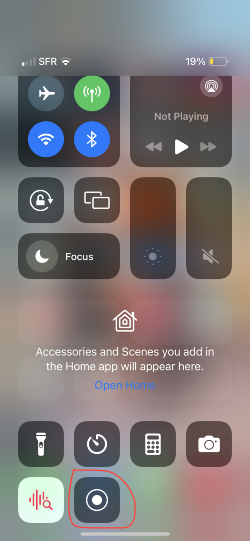
2) Access the Control Centre: After setting up, navigate back to your iPhone's Home screen. If you're using an iPhone with Face ID, swipe down from the top right corner. If you're using an iPhone with a Home button, swipe up from the bottom edge to open the Control Centre.
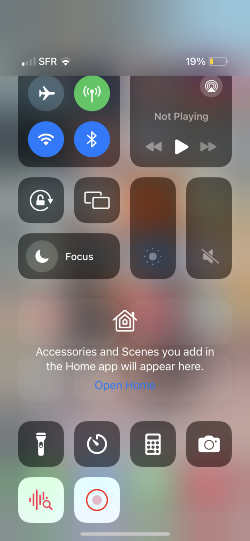
3) Start Recording iPhone Screen: In the Control Centre, you’ll spot a grey Record button which signifies the screen recording feature. Tap on it. A 3-second countdown will begin. Exit the Control Centre. Now, your iPhone should be recording both the screen and the audio.
4) Stop the Recording: Once you've recorded what you need, go back to the Control Centre. Here, you'll notice the recording icon has turned red. Tap on it to halt the recording. Your video will be automatically saved to the Photos app.
To wrap up, recording a Google Meet session isn't available to every participant. Remember, you must have the necessary permissions – like being the host, co-host, or part of the same organization, and importantly, a Google Workspace subscription. If you're wondering why you can't find your recordings, ensure you're checking in the right places and understand the prerequisites. While Google Meet's web app does have a direct recording feature, if you're on devices like Windows, Mac, Android, iPhone, or iPad, you can resort to screen recorders or browser extensions for a free alternative. Make sure you're equipped with the right tools and knowledge before your next Google Meet session. Happy recording!