

How to record audio with my iPhone ?

Whether you're capturing a melody that's popped into your head, recording a voice note for later, or documenting a special moment, knowing the best way to record audio on your iPhone is crucial.
While many assume they need a third-party app, the iPhone comes equipped with a native voice recorder that's more comprehensive than you might believe. In this guide, we'll delve into the steps and features of the voice recorder iPhone offers, ensuring you maximise your iPhone voice note experience.
So, let's dive in and explore the best way to record audio on your favourite device.
Where is the Voice Recorder on My iPhone?
Many iPhone users might not be aware of the built-in feature that allows for easy audio recording.
To locate it, simply swipe right from your home screen to access the search bar, or use the search bar on any page of your iPhone. Now, type in "Voice Memos". The app should promptly appear in the search results. It's worth noting that this app comes pre-installed with your iPhone, so there's no need to download any third-party apps to get started.
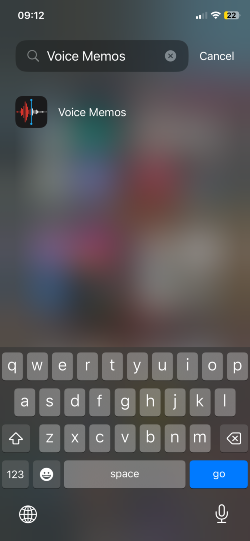
The "Voice Memos" app, also commonly referred to as "voice memo", is user-friendly and quite straightforward. Once you open it, you can begin recording with a simple tap.
How to Change the Name of a Recording on iOS Voice Recorder
One of the many features of “Voice Memos” app is the ability to rename recordings. This is incredibly handy for organizing your memos or differentiating between different recordings.
To change the name of a recording, follow these simple steps:
- Access the Voice Memos App: Firstly, open the iOS Voice Recorder by following the short tutorial in the previous section
- Choose Your Recording: Once inside, you'll see a list of all your recordings. Navigate to the recording whose name you want to change.
- Edit the Name: Here's where it gets super simple. To edit the name, all you need to do is tap on the title of the recording. A text box will appear, allowing you to type in your desired name. Once you're done, simply tap anywhere outside the text box or press the 'Done' button on your keyboard.
And that's it! In just three simple steps, you've successfully renamed a recording.
How to Edit Voice Memos on iPhone
Recording audio notes on your iPhone can be a handy way to keep track of crucial information, but sometimes, there's a need to polish or fine-tune those recordings for clarity or conciseness. In this section, we will delve deep into how to edit voice memos on iPhone and discuss some essential tips that'll come handy.
Exploring the Voice Memo Settings
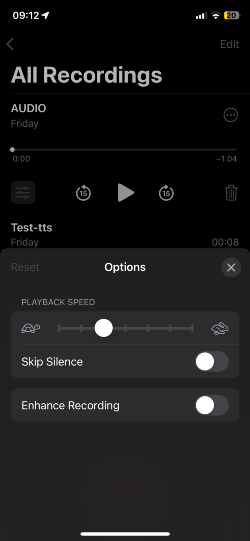
Once you've made a recording, there are two primary options to edit the audio file – the slider at the bottom left and the (...) icon located at the top right of the recording. Here's a breakdown of both:
1) The Slider at the Bottom Left: Utilize this slider for a few neat tricks:
- Speed Adjustments: Change the playback speed of the recordings – perfect for those times when you want to review voice notes faster or slower.
- Skip Silences: No more waiting through long pauses. This feature automatically skips parts where no sound is detected.
- Enhance Recording: With just one click, you can enhance recording voice memos. This function automatically refines the audio quality, making your recordings clearer.
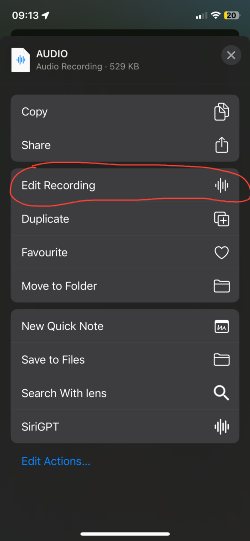
2) The (...) Icon at the Top Right: Tap on this icon, and a dropdown menu appears. From here:
- Select "Edit Recording." This is where the magic happens.
- Inside the edit menu, you have the ability to trim audio or even replace portions of it. Additionally, if you're looking to access features like speed adjustment or skip silences, you'll find those options at the top left again.
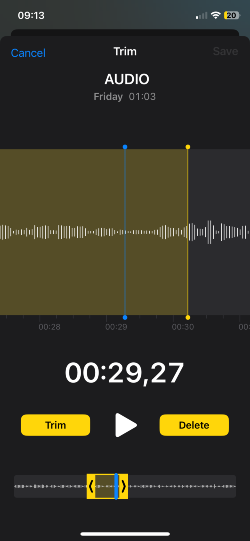
A Word of Caution on Trimming
When considering how to trim voice recording on iPhone, always exercise caution. If you've trimmed a portion of your audio, remember that this action is irreversible.
You might find yourself asking, "how do I recover the original voice memo after accidentally trimming it?" Sadly, unless you revert to a previous iPhone backup, the original recording can't be restored. Therefore, always be certain before making a trim!
Combining Voice Memos
If you're wondering how to combine voice recordings on iPhone, unfortunately, this can't be done natively. But don't worry! There are third-party apps available that can assist. For a step-by-step guide on this, check out this detailed tutorial: How to Combine Voice Memos on iPhone.
How to Enhance audio quality recordings on Your iPhone
Are you striving to achieve the best audio recordings on your iPhone? Perfect, because you've come to the right place. The ability to record voice memos or any form of audio can be significantly improved if you know the right tweaks and tricks. So, let's dive in and understand how to record high-quality audio on iPhone.
Enhance Recording in Voice Memos
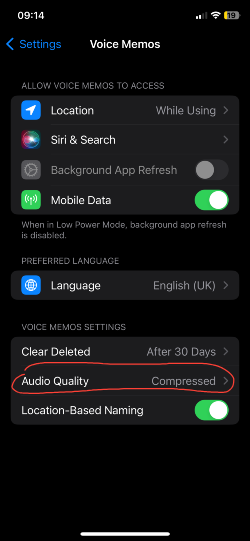
The iPhone’s built-in Voice Memos app offers an easy way to quickly record audio. By default, the app is set to ‘compressed’, which means the audio is in a reduced file size but at the expense of quality.
To enhance your recording, head over to Settings. Scroll down and find Voice Memos. Tap on it. You'll see an option for audio quality. Change it from 'compressed' to 'Lossless'.
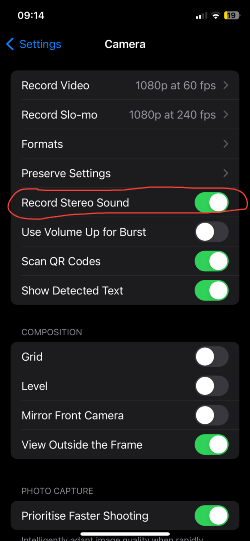
Record Stereo Sound with a Twist
Now, if you're trying to record stereo sound on iPhone, Voice Memos won't be of much help. But here's a savvy trick: use the camera! Navigate to Settings > Camera. Here, you'll find an on/off slider that allows you to activate stereo sound for your video recordings.
How to extract audio from video on iPhone?
Unfortunately, iOS doesn’t offer a built-in feature for this. However, there's a solution! The Shortcut app can assist. For a step-by-step guide, check out this comprehensive YouTube tutorial.
Go the Extra Mile with External Equipment
To truly enhance recording voice memos and achieve the best audio fidelity, consider investing in recording equipment for iPhone.
Connecting an external microphone to your iPhone can significantly boost the quality. It might seem a bit technical, but don't fret. We found an excellent article that breaks down the process: How to Use an External USB Mic with iPhone.
Understanding how to record better audio on iPhone isn't rocket science. With a few settings tweaks and some additional equipment, you can capture sound like a pro.
How to share Recordings
Now, you're wondering how to send recordings on iPhone. Here's a step-by-step guide:
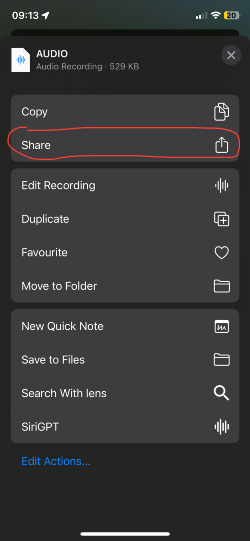
1) Locate the Recording: Start by opening the app where you saved your audio recording. Most likely, this will be the Voice Memos app. (But it could be the camera app as we saw before)
2) Access Share Options: On finding the recording you wish to share, look for the '(...)' icon. Tap on this icon.
3) Choose 'Share': A menu will appear, and within it, you'll see the 'Share' option. Give that a tap.
4) Select Your Preferred Method: Now, a plethora of sharing methods will be presented to you. Whether you prefer sharing via SMS, Messenger, Whatsapp, Mail, or even Airdrop, iPhone has you covered. Simply tap on your desired method and follow any additional prompts.
5) For Mac Users: If you own a Mac, there's even better news! There's no need to go through the 'Share' options. Thanks to iCloud's synchronization, your recordings should automatically be available on your Mac once the sync completes. Ensure both your iPhone and Mac are connected to the same iCloud account for seamless transfer.
How to record sound that comes directly from the iPhone ?
Why might you want to do this? Well, imagine stumbling upon an interesting video on YouTube or Instagram and wanting to save its audio for later. Instead of going through roundabout ways, you can record it directly on your iPhone!
But here’s a word of caution: while recording music on iPhone or any other content, always respect copyright laws. It's essential not to misuse this feature by recording and distributing content without permissions.
So, how to record internal audio on iPhone? Follow these simple steps:
1) Setting up Screen Recording: Before you can record, you need to enable the screen recording feature. Go to Settings > Control Centre, and then tap the Add button next to Screen Recording.
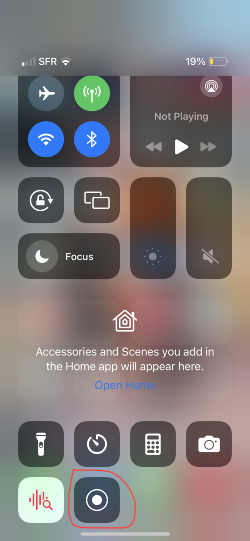
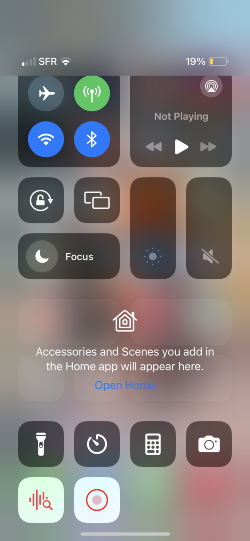
2) Access the Control Centre: Navigate back to your iPhone's Home screen. Swipe from the top to the bottom to open the Control Centre.
3) Start Recording: Within the Control Centre, you’ll find a grey Record button. Tap on it and then exit the Control Centre. Now, your iPhone should be recording both the screen and the audio.
4) Stop the Recording: Once you’re done, you'll need to stop the recording. Head back to the Control Centre and look for the red recording icon. Simply tap on it, and your recording will come to a halt.
Compatibility with older iPhone
For those who are considering using an older iPhone model, one of the common questions is, "Can I still voice record on iPhone 4 and other older devices?"
The answer is a reassuring yes! The ability to record voice memos has been a standard feature since at least the iPhone 4, ensuring that you can capture audio even with earlier models.
However, it's essential to note that the features associated with voice recording might vary depending on your iOS version. For example, while the recent iPhones offer features like automatic enhancing of audio and stereo sound, some older devices may not have these benefits. Moreover, the compatibility with high-quality external mics can also be limited based on the model and iOS version you're using.
How long can iPhone record voice memo in a single take?
The answer is up to 3 hours. This duration corresponds to approximately 2Gb of memory on your iPhone.
However, while audio recordings might not consume as much storage as videos, it's crucial to ensure that you have sufficient space before starting. A lengthy recording can come to a premature end if your iPhone runs out of storage mid-way. Therefore, always keep an eye on the available size on your iPhone to avoid unexpected interruptions.
Voice recordings aren’t working on my iPhone
Experiencing technical hiccups with your iPhone is a common occurrence, and voice recording not working on iPhone can be particularly frustrating.
1) Troubleshoot the App: Sometimes, apps don't operate as they should. If you notice your voice recording application isn't picking up sound or isn't saving your recordings, the first step is straightforward. Try restarting the app. Close it completely and then reopen it to see if the issue resolves.
2) Restart Your iPhone: If restarting the app doesn't fix the problem, take it a step further by restarting your iPhone. Turning your device off and on can refresh its internal processes, often resolving minor glitches or software bugs.
3) Dive Deeper: If voice recording is still not working on your iPhone after trying the above solutions, don't worry, we've got you covered. We recommend checking out this comprehensive tutorial:
How to Fix Voice Recording Issues on iPhone
This video guide, courtesy of Technomentary, walks you through the steps to diagnose and remedy common audio recording problems on the iPhone.
In summary, recording audio on an iPhone is a straightforward process, ensuring that capturing your favorite moments or important notes is just a few taps away. Utilize the built-in Voice Memos app for quick recordings and consider third-party apps for enhanced features. Happy recording!